
Get verified! Setup git commit signing on Windows
1 September 2021When you work locally on your computer, git allows you to set the name and email address of the author to anything you wish. This, potentially, makes it difficult for other people to be confident that commits you create were actually created by you when you push your commits to a public repository on GitHub.
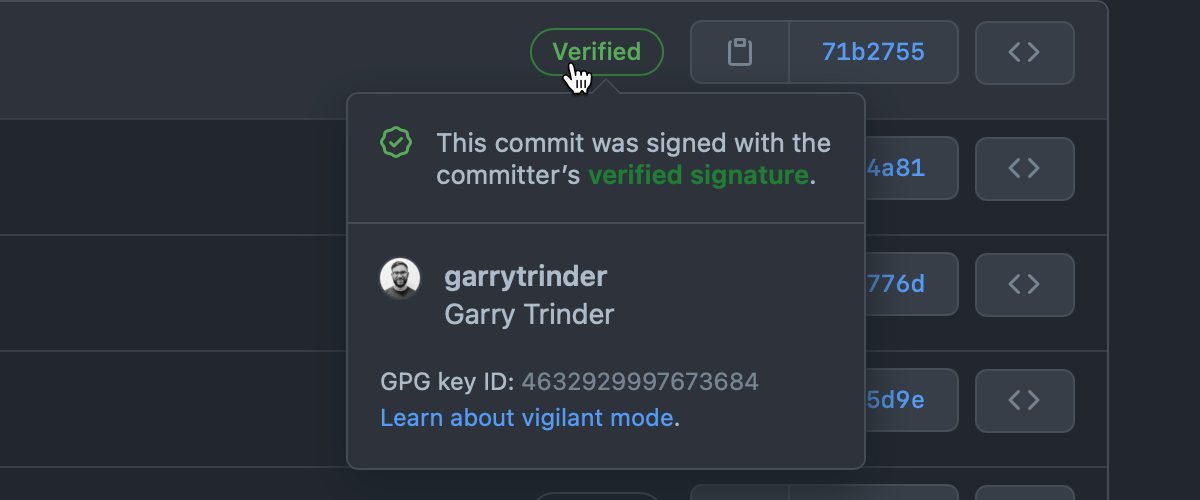
To help solve this problem you can configure git to sign your commits. When you sign commits locally and push them to GitHub, your commits can be verified by GitHub as coming from a trusted source, marking them as Verified and stamped with a green tick ✅.
This guide will step through the process of how to configure commit signing in your local git repositories in Windows and how to configure GitHub to show your commits as verified.
This guide requires that you have at least git for Windows v2.19.1 installed, as after this release, git was bundled with a program called gpg.
The GNU Privacy Guard commonly know as gpg, is a command line tool that we will use to generate a key on your local machine, which will be used to sign your git commits with.
Verify that GPG is in PATH
To ensure that you can use gpg in a shell other than git bash where it is auto-loaded for you, you should add the C:\Program Files\Git\usr\bin to your system environment variables, which is the location of where the gpg command line tool is installed with git.
To verify that gpg is in your PATH, execute gpg --version in either a command shell or PowerShell session.
Generate GPG key
To generate a GPG key, execute gpg --full-generate-key.
This will start an interactive wizard where you will be prompted to confirm several details, the first choice you will need to make is to select the type of key you want.
gpg --full-generate-key

gpg (GnuPG) 2.2.29-unknown; Copyright (C) 2021 Free Software Foundation, Inc.
This is free software: you are free to change and redistribute it.
There is NO WARRANTY, to the extent permitted by law.

Please select what kind of key you want:
   (1) RSA and RSA (default)
   (2) DSA and Elgamal
   (3) DSA (sign only)
   (4) RSA (sign only)
  (14) Existing key from card
Your selection?
For ease here, I would recommend accepting the default option, RSA and RSA, confirm by hitting return.
The next choice is to confirm the keysize you want to use.
RSA keys may be between 1024 and 4096 bits long.
What keysize do you want? (3072)
Again for ease here, I would recommend accepting the default key size, 3072, confirm by hitting return.
We are next asked the set the lifetime of the key, in either days, weeks, months, years or set it to not expire.
Please specify how long the key should be valid.
         0 = key does not expire
      <n>  = key expires in n days
      <n>w = key expires in n weeks
      <n>m = key expires in n months
      <n>y = key expires in n years
Key is valid for? (0)
The choice here is entirely upto you, however I would recommend setting an expiry date rather than accepting the default which does not apply an expiry date.
I opted for setting the key to expire in 1 year from now, so enter 1y and confirm by hitting return.
You will be asked to confirm the expiry date.
Key expires at Tue Aug 30 17:19:20 2022 GMTST
Is this correct? (y/N)
I would recommend that if you have opted to set an expiry date on your key then take this opportunity to set a reminder in your calendar a week before the date shown so you can recycle your keys in good time.
Confirm that the date is correct by entering y and confirm by hitting return.
Now we need to provide our identity, which will be used as part of the key.
Enter your name in the real name section and confirm by hitting return, then enter the email address associated with your GitHub account again confirming by hitting return.
If you don’t want to use your personal email address, you can also use a GitHub
@users.noreply.github.comemail address, if you have this configured in your GitHub profile
Finally, you will be also asked for a comment, whilst this is optional and can be left blank, you may want to add GitHub here as the comment. Adding a comment here will help distinguish between different keys that you may create in the future for other services that use the same identity.
Real name: Megan Bowen
Email address: meganb@contoso.com
Comment: GitHub
You selected this USER-ID:
    "Megan Bowen (GitHub) <meganb@contoso.com>"

Change (N)ame, (C)omment, (E)mail or (O)kay/(Q)uit?
Confirm the generated USER-ID by entering O and hitting return.
You will now be prompted by a Windows dialog box from an application called pinentry to enter a passphrase. The passphrase is used to encrypt the key, this makes the actual key itself useless to an attacker as the passphrase entered at this stage will be required to use it.
Enter your passphrase, click OK and re-confirm the passphrase by entering it again and clicking OK.
It is possible to skip the passphrase by entering nothing into the passphrase field however it is strongly recommended that you enter a strong passphrase. For this step, I used a password generator and stored the passphrase safely in my password manager for future use.
Export your key
After completing the key generation wizard, you will be presented with an output in the command line describing the key you just created.
We need to generate a lot of random bytes. It is a good idea to perform some other action (type on the keyboard, move the mouse, utilize the disks) during the prime generation; this gives the random number generator a better chance to gain enough entropy.
We need to generate a lot of random bytes. It is a good idea to perform some other action (type on the keyboard, move the mouse, utilize the disks) during the prime generation; this gives the random number generator a better chance to gain enough entropy.
gpg: key 9910FD82B391958B marked as ultimately trusted
gpg: revocation certificate stored as '/c/Users/meganb/.gnupg/openpgp-revocs.d/93154FC4A7100D0C2C9455689910FD82B391958B.rev'
public and secret key created and signed.

pub   rsa3072 2021-08-31 [SC] [expires: 2022-08-31]
      93154FC4A7100D0C2C9455689910FD82B391958B
uid                      Megan Bowen (GitHub) <meganb@contoso.com>
sub   rsa3072 2021-08-31 [E] [expires: 2022-08-31]
The information in the final section displays the key type and size (rsa3072), expiry date (2022-08-31), public key (93154FC4A7100D0C2C9455689910FD82B391958B) and the USER-ID associated with the key (Megan Bowen (GitHub) <meganb@contoso.com>).
Now that we have created our key, we need to obtain the ID of the key we want to use, to do that we list the keys in the long form format by executing gpg --list-secret-keys --keyid-format=long.
gpg --list-secret-keys --keyid-format=long

gpg: checking the trustdb
gpg: marginals needed: 3  completes needed: 1  trust model: pgp
gpg: depth: 0  valid:   2  signed:   0  trust: 0-, 0q, 0n, 0m, 0f, 2u
gpg: next trustdb check due at 2022-08-27
/c/Users/meganb/.gnupg/pubring.kbx
-----------------------------------------------
sec   rsa3072/9910FD82B391958B 2021-08-31 [SC] [expires: 2022-08-31]
      93154FC4A7100D0C2C9455689910FD82B391958B
uid                 [ultimate] Megan Bowen (GitHub) <meganb@contoso.com>
ssb   rsa3072/DCDCD9E5E414740A 2021-08-31 [E] [expires: 2022-08-31]
The ID of the key above is 9910FD82B391958B, we can use this ID to export the public key which we will use to associated the key we just generated with our GitHub account.
To export the public key, execute gpg --armor --export 9910FD82B391958B.
gpg --armor --export 9910FD82B391958B

-----BEGIN PGP PUBLIC KEY BLOCK-----

mQGNBGEtvXQBDADI1Oratk9LGixH2TN37AGx0yaB5oL0AYSJG2u7uOguDtBemVZo
LlZvNtWpgDqqyRAd81yw7ren30GFbWw2pAOwl2UYL6qTy5eulGzUN5Hse1x6NJK5
...
...
...
i3oT4HsHiwrXXk6Ajw9fotO7Zhx2h2Utqv8c+QypueTpVRcRNk/s
=2BN3
-----END PGP PUBLIC KEY BLOCK-----
Add GPG key to GitHub
We now need to tell GitHub that if we sign commits with this key our commits will be marked as verified, to do this you will need to go into your GitHub settings, create a new GPG key, paste the contents of the public key that we exported (including the comment lines) and click Add GPG key.
Configure git to sign commits
Up to this point we have created a key and told GitHub to mark commits as verified when commits are signed with keys that it knows about when they are pushed to repositories, however we have not yet configured our local instance of git to sign our commits locally and tell it which key should be used when doing so.
We can either set the configuration at the global level, applying globally will turn on commit signing for all repositories and you will use the same key for all commits, or at the local repository level. At the repository level, you need to explicitly turn on commit signing and set the signing key for each repository you use, whilst this may sound like more work, I would recommend that this is an approach you should take if you use different source control providers on the same machine.
I regularly use a combination of GitHub, GitHub Enterprise and Azure DevOps, whilst they all use the same git instance for source control, I need to flexibility to set the configuration I need depending on the repo and source control provider I am using. For example, I use different keys for GitHub and GitHub Enterprise, whereas Azure DevOps does not support the use of GPG keys.
Let’s set the config on our local repo, first, lets ensure that our commits are being signed with the correct username and email, these should match the details you entered when generating the key.
git config --local user.name "Megan Bowen"
git config --local user.email "meganb@contoso.com"
Then we can enable commit signing and tell git which key to use
git config --local commit.gpgsign true
git config --local user.signingkey 9910FD82B391958B
If you really want to set the configuration globally, remove the
--localswitch in the above examples.
Test your changes
When you next make a commit in the repo, using git commit, you will be prompted by the pinentry program to enter the key passphrase. Enter the passphrase in the dialog and click OK to confirm and sign your commit. By default, gpp will cache your passphase for the next 10 minutes before asking again.
You can increase the timeout by creating a file called
gpg-agent.confin the.gnupgfolder in your Windows profile location, e.g. C:\Users\meganb.gnupg, containing the linedefault-cache-ttl 60, where60sets the timeout to1 minute
Now when you push your commits to GitHub from this repository, you will now see that in the commit log, your commits will display the Verified mark.